Disclaimer: Opening any Carter Release will void the original warranty and release Carter from any liability due to personal tamperment. For any release needing maintenance that is still under warranty, it’s best to send it back directly to Carter. If your warranty is a past term and you are interested in self maintenance, then this is the recommended method.
There is a song that I once learned at Sunday School: He has the whole world in his hands. You know, in an archery tournament that is a pretty accurate saying as your equipment is very important to your archery success. The mechanical release is arguably the most important accessory of all for compound shooters; if not the release itself, then the process of what happens in the back half of your body at full draw until shot execution.
Whether you are willing to admit it or not, how your release functions dictates the execution of the rest of your shot sequence. We have all also heard the saying ‘no guts, no glory.’ I want you to keep this saying in mind and remember it. My goal here is to show you how to properly set and maintain the ‘guts’ of your release aid.
I have used and supported Carter Enterprises for the majority of my competitive career. In my opinion, Jerry Carter is the best release aid designer and manufacturer in the world. The success of Carter’s releases over the last decade proves that. I know that at one time I thought that the release aid was such a complex mechanism that to open it up seemed taboo. If I wanted to try a new spring tension, or need to clean my release aid, I used to send it back to Carter to do this for me. The reality is that they are NOT that hard to maintain and adjust. You can do this yourself with some guidance, and it will help you in your mental game knowing that your equipment is perfect for your event. Before getting into cleaning and adjustments, let’s first take a look at the guts of your release aid and get familiar with the parts and names of parts for your Carter trigger releases.
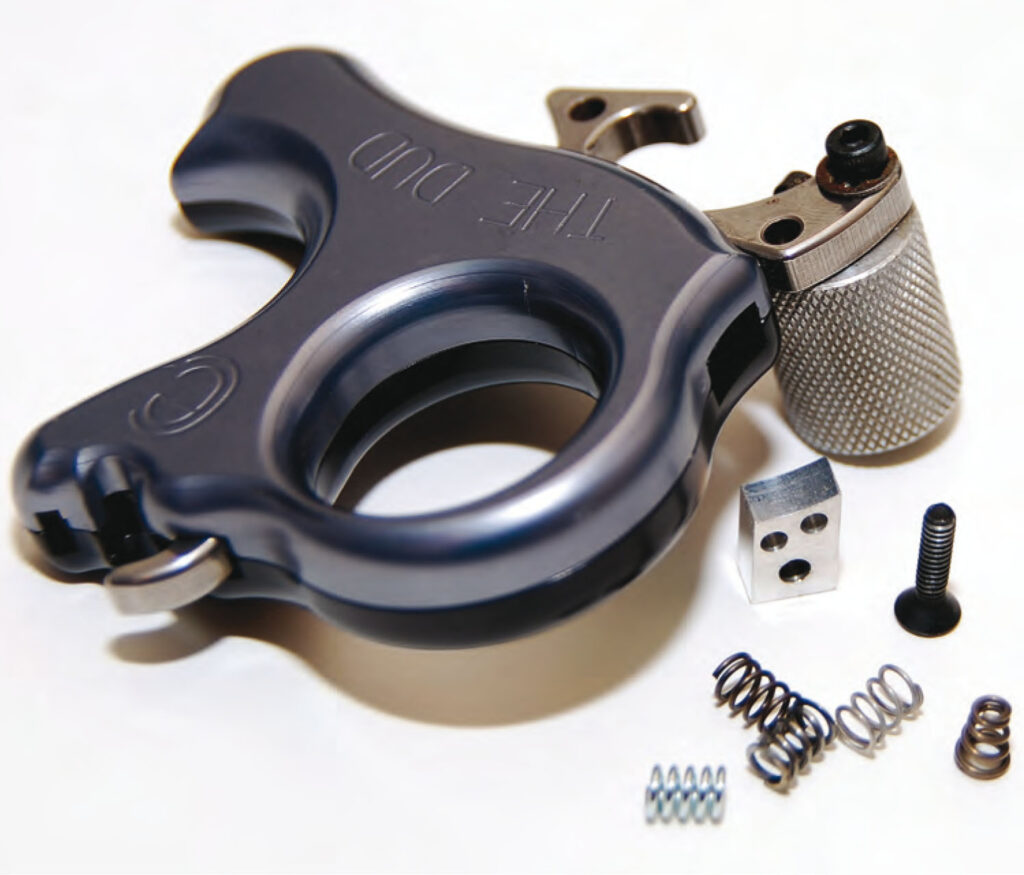
Component Names
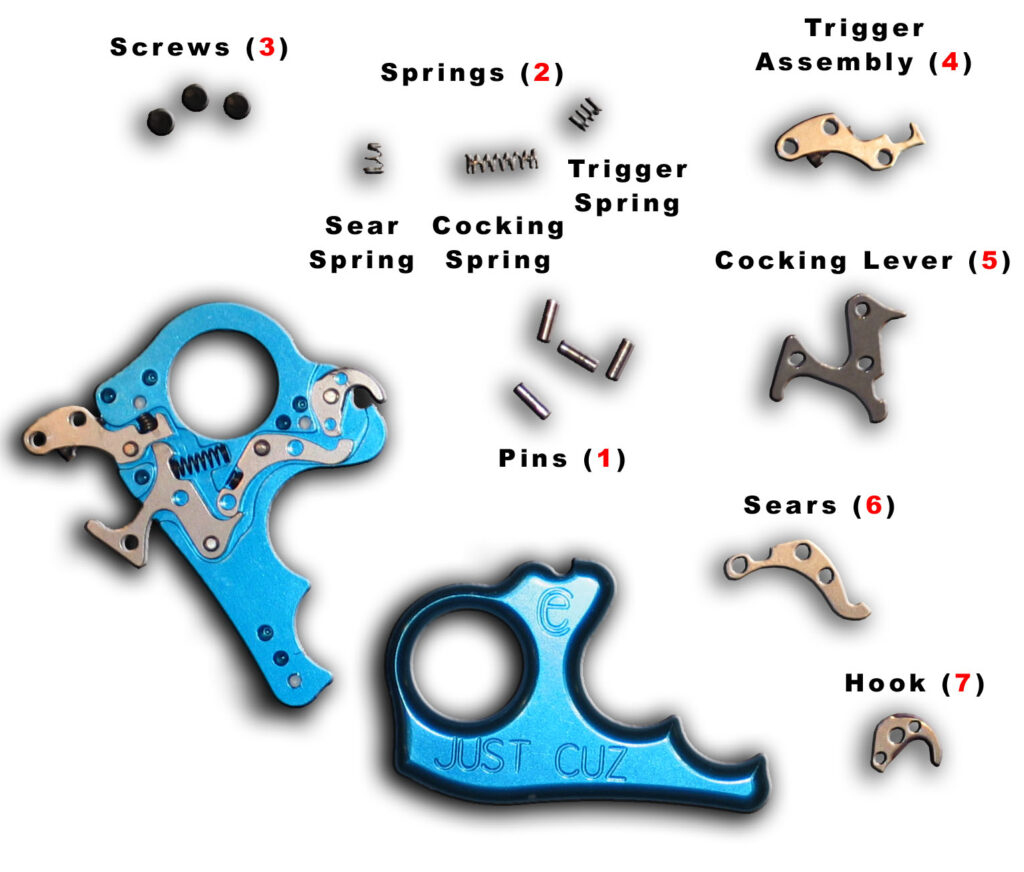
The internal components of your release comprise of pins (1), springs (2), screws (3), trigger (4), cocking lever (5), sear (6) and the hook (7). That’s it! The function of the springs is pretty obvious. They allow for different tensions or pressures, causing the release to fire. The most common weight springs are 30#, 43#, 95# and 125#. The sear spring has two weights: light and heavy. The releases that are purchased off the shelf are most likely to have 43# springs. The pins have two purposes. First, they hold the release casings in alignment. They also allow for the trigger, cocking lever, sear and hook to pivot on them. The four other components all work together to make the release function. By pushing in the cocking lever you activate the sear which allows you to close the hook onto the bow It also loads the trigger, making it active to fire. Now that you understand the internal parts of your release, let’s talk about how to open it up to see these parts firsthand.
Separation
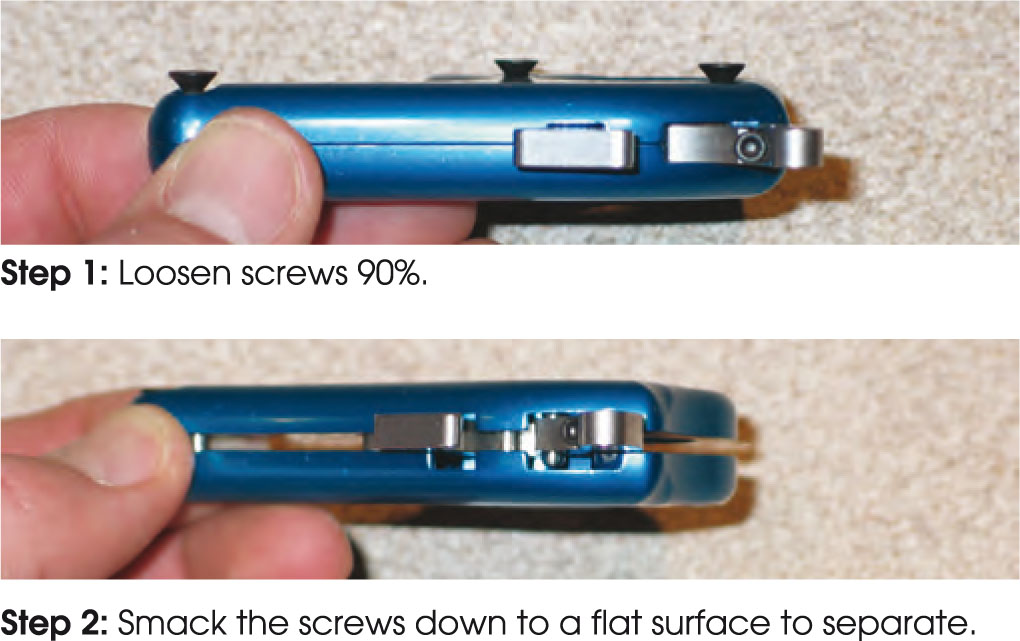
Opening the release or separating the casing is really easy. First take off the trigger post or adjust the trigger knob. Then, take your release and loosen the screws that are holding your casing together. All these screws should be on the same side of the release. There should be any thing from three to four screws. Now that you have the screws all the way out, you have to put them back in. The trick here is to give the screws only ¼ turn at the most. This will leave about 90% of the screw out of the casing. Once you have all screws in this position, it’s wise to place them in a plastic zip-lock baggy. There are two reasons for the plastic bag. The first reason is that it contains all your parts once the release is opened. I would recommend working on your release in this bag during the entire duration of your maintenance. Believe me, it is really frustrating to have a spring shoot across the room and have to find it! Now that the release is in the bag you need to hold the release flat with the exposed screws facing down and slam it down onto a very hard surface. (As a rule of thumb, I know my wife doesn’t really appreciate doing this step on the kitchen table!).
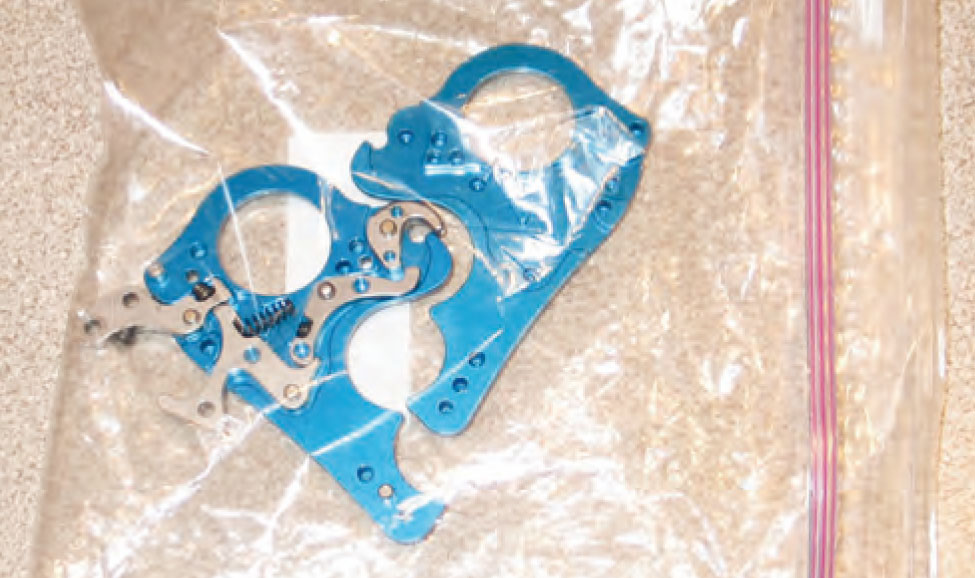
This allows the exposed screws to drive the two halves of the casings apart. Sometimes you may have to repeat this step a few times. If the release is really old, or if the pins are rusty, this could be difficult. Once the casing is separated you can remove the screws completely. You may need to use something thin, flat and smooth to pry the casing apart. Take care in doing this because you can easily mar the casing and make it really noticeable to all your friends that you didn’t do this properly. Make sure you keep the release in the bag when you fully separate it. Now that your release is separated, you can either clean it or make changes to your parts.
Cleaning and Maintenance
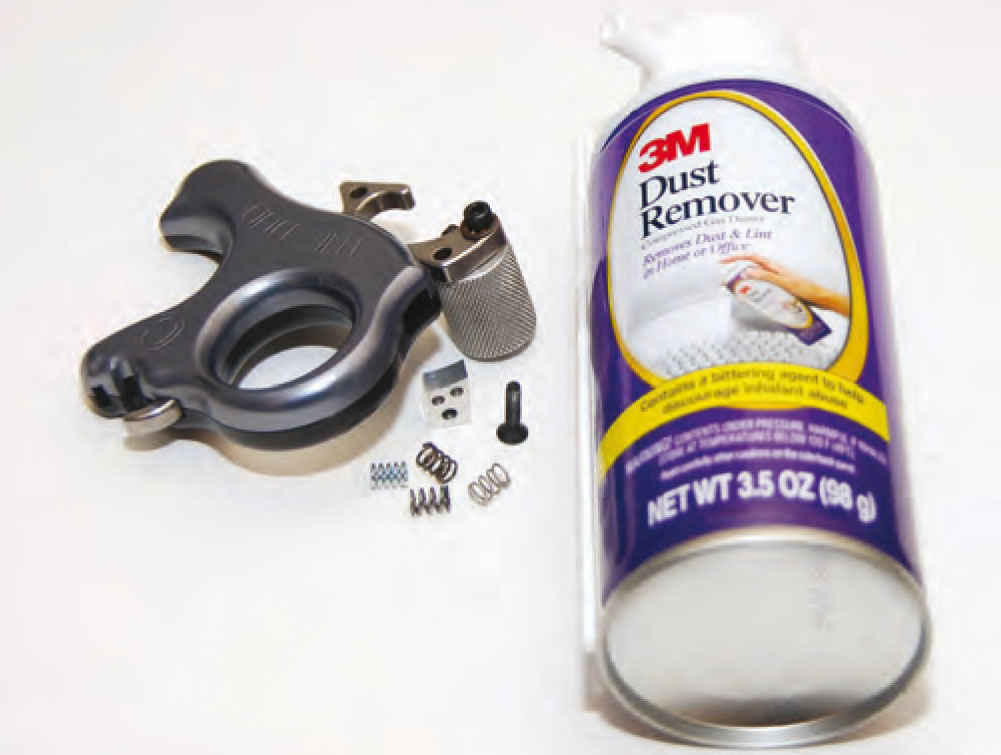
It is very important for you to make annual cleanings of your release. Dirt, dust, lint and rust can all cause your release to misfire and cost you valuable points. The easiest way to clean it is to use some type of aerosol electrical cleaner. Use something that’s oil free and will collect dust and dirt, for example Wd-40. You can spray out the grime with this cleaner, and also use a Cotton bud to remove access debris. Once the cleaner is used, use a compressed air can to blow off anything left over and to dry off the parts before closing. If nothing has been moved since opening the casing, it should be easy to close it and place the screws back in.
Changing Springs
I personally like to change the spring tension in my releases several times throughout the year. I like to do this depending on the style of shooting, terrain, release style or hand positioning, and the amount of time I have to properly execute a shot. If you want to increase or decrease spring tension then order the preferred springs as a set. Mismatching the springs can cause a release to malfunction. There are usually only three springs to worry about, the trigger spring, cocking spring and sear spring. Over the years these springs have taken on different shapes and lengths depending on the model release. If you specify the release you have when ordering parts you should get the correct ones. I like to install the smaller springs first, which are the sear and trigger springs. Simply compress them, using a thin flat object, and insert them into the designated slot. Next you will need to install the cocking lever spring.
The springs are coiled, and where the coil stops on each end there is the lip of the spring. A helpful hint is to make sure this lip is facing down when you install it in the casing. This prevents it from catching on the other half of the casing when you are trying to close it. After closing the casings, actively cock and fire the release. If everything is functioning properly, you can now place the screws back into the casing to hold the release together. If it is malfunctioning then you need to open the casing back up and check the spring positioning.
Setting Trigger Travel
The trigger travel adjustment is changed using the screw in the trigger itself. This screw is used only to adjust travel it does not drastically change the amount of pressure you need to fire the release. Too many times I have noticed people loosening that screw because they thought the release was too light. Loosening the trigger causes it to move before it fires. That movement is something that your mind picks up on and causes you to have target panic. When set properly, a Carter release should have zero travel regardless of the preferred trigger tension. To adjust this to optimum settings, you should cock the release and slowly tighten the trigger screw until you hear the release fire. Then back the screw off about 1/8 of a turn. Try cocking the release again and try firing it. If you feel movement before it fires you need to tighten the screw slightly. If the release fires as soon as your finger touches it then it is too fast, and you will need to carefully back out the trigger screw. Ultimately, your release should feel like a clean, crisp trigger off a $10,000 rifle. Regardless of what springs you have in your release, the travel should be non-existent.
I.T.S. Systemmaintaining
Carter has come out with what they are calling the ITS system. This system allows you to remove one screw on the release casing, and upon removing the screw a small block will eject. Under that block is the spring that controls the trigger tension. This system allows for easy change of preferred tension screws and cleaning is much easier because it can be done without opening the casing. You can simply remove the ITS block to spray the cleaner inside the hole, and then blow out the excess using the compressed air. I have been using this for the last few months, and it works very well which makes you wonder why you didn’t think of it yourself When I received mine I instantly appreciated the ease of making changes to it.
Things to Remember
This process is really very simple and is also very important. Don’t be fooled: how your release functions plays a big part in your mental game. If your release is set properly and your shot is executed correctly you should have a good shot. I have learned the hard way that neglecting your release can cause problems at the worst times. I like to go to a tournament knowing that if something is going to go wrong it will be because of me, not my equipment.
These processes are pretty simple, but if you get it wrong don’t fear: Carter has seen almost everything over the years and will fix it. Remember earlier when I said there are two reasons for the plastic bag? Well, the other use for the bag is to zip up all your unassembled parts and mail it back to Carter for them to put it back together for you! All joking aside, you can either learn to do this yourself or pay someone else to do it. The fact is, at some point, it will have to be done.
Take my advice and do it before you realize you need to.
Good Shooting!
— John Dudley